Enterprise-Class WiFi at Home
The biggest complaint about WiFi in homes seems to be the lack of WiFi at the back of their houses or that the further away from their Broadband Router the weaker the signal is. I often see a lot of users saying that their Virgin Media WiFi has gone down again, this may be because that they are sitting on their neighbour’s channel, more about here.
One of the problems with combined Broadband Routers with WiFi is that they are having to do so much more than just Wireless and do not have room for decent antennas within them. Routers are normally located behind or under your TV too so the signal is already going to be having issues before it tries to get through brick walls and ceilings.
As you can see from this image below, along with the two WiFi Sockets/modules, other components make up this Broadband Router, such as the Ethernet ports and RF tuner.
, 
With a stand-alone Wireless Access Point (WAP) you get Enterprise-Class WiFi as the WAP’s are only providing Wireless for you as you will see from the image below, everything below the red line managers the Ethernet leaving everything above the line is dedicated to providing Enterprise-class WiFi.

Normally for Enterprise-Class WiFi you would need a WLAN Controller in this example I will choose a cisco AIR-CT3504-K9, these come in at around £2700.00 +VAT, plus an access point Cisco Aironet AP2802I Wireless Access Point which comes in at around £450, that’s over £3k for Enterprise-Class WiFi.
The good news is you can have Enterprise-Class WiFi at Home for under £120 or under, depending on the access point you choose.
 |  |  |
|
|---|---|---|---|
| UAP-AC-LITE | UAP-AC-LR | UAP-AC-PRO | |
| Size (diameter) | 160mm | 175mm | 198mm |
| 2.4 GHz speed | 300Mbps | 450Mbps | 450Mbps |
| 2.4 GHz Antennas | 2x2 | 3x3 | 3x4 |
| 5 Ghz speed | 876Mbps | 876Mbps | 1300Mbps |
| 5 GHz Antennas | 2x2 | 2x2 | 3x3 |
| Range | 122m (400ft) | 183m (600ft) | 183m (600ft) |
| Chetnet Price | £68.00 | £84.00 | £125.00 |
Unifi AC LR vs PRO
The difference between the lite and the other is obvious, but the difference between the Unifi AC-LR and the Unifi AC-PRO is a bit harder. You might be tempted to buy the faster and more expensive AC-PRO (bigger is better/more antennas is better/more expensive is better ?). But there is a big and important difference between the two.
The AC-Pro has 3×3 MIMO antennas to get that high network speed, but to use it, your endpoint (notebook, smartphone, tv) must also be able to handle it. So if you are after maximum speed and you have a notebook that also supports 5ghz network at 1300 Mbps, then you should go for the AC-Pro.
The AC-LR has a bigger and more sensitive antenna. This allows it to cover a bigger area, but even more important, picking up the weaker signal from a smartphone or tablet. Mobile devices have only a small antenna built-in it’s due to the lack of space and aesthetics. So they can receive the signal of a powerful access point, but they can’t send it the same distance back. That’s why you need a big and sensitive antenna to pick the weak signal up.
Before you begin you will need to download two apps from either Google Play or the OS app store
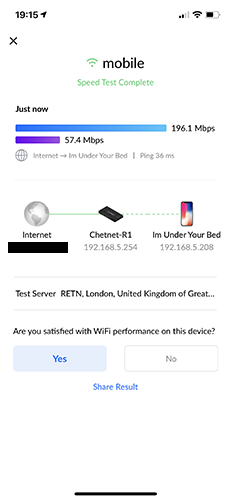
The first app we need is Ubiquiti WiFiman, this app will test your Internet Speed, We recommend testing your speed in multiple places around your home or office to get the most accurate results


Next, you will need to grab the Unifi App, this will be used to configure the Access Point.


We need to install the Unifi AP, make sure it’s connected with an ethernet cable to your network, and powered with the Power Injector provided. When the led is solidly white, you know that the AP is connected and in the factory default state.
Start the app on your mobile devices and click add device

The Unifi AP will show up in the list of discovered devices. If you don’t see the access point, make sure your WiFi on your mobile device is enabled. Alternatively, you can scan the QR code on the back of the AP. (Click on the menu top right > Scan QR), once your AP has been located click New Device Setup

This will now Provision you new AP, this takes about 5 minutes

Next, you will be asked to set up your WiFi SSID (WiFi name) and password, if you click Advanced you will be able to separate 2.4GHz and 5GHz.

Once complete, you will be asked to connect to your WiFi

If you run a speed test right now when the AP defaults to a channel width of 40 MHz you may not get the desired speeds you are after.

Whilst you are logged into the AP, you will be able to see a few stats such as traffic in and out and how many clients you have connected.
Whilst here click configure from the top right of your screen, from here you will be able to see if there are any firmware changes, Click on Radios and then under the Radio 5GHz, select 80 MHz, then the back arrow on the top right of the screen and then save, this will cause you AP to reboot.

Now run the speed test again and you should see a marked improvement

There you have it; Enterprise-Class WiFi at Home. If you would like more information on any of the above then please do drop us a message

