IoT Security
As more and more IoT (Internet of Things) or smart devices come the market they are increasingly targeted by hackers looking to find ways into your network, this includes Smart Plugs, Thermostats, Amazon Echo, Light Builds, Garden Lights on Wifi, Gaming Consoles, Door Bells, Security Cameras and a whole lot more, but how many of us think about IoT Security or do you just plug them in and let them do their thing, did you know your smart lightbulb has access
Today I’m going to separate all of my IoT devices so they can still access the internet for their updates and to be able to talk to their controllers, but I’m going to stop them talking to the rest of my network, if a hacker does manage to penetrate my doorbell or Alexa, that’s as far as they get, they will not have access to my home/business network because of my IoT Security.
Image of my LAN will appear here soon
The Goals is to have a 2nd Network for IoT Security
VLAN 70
IP Address Range 192.168.70.0/24
DHCP Server 192.168.70.1 – 200
Hidden SSID
Firewall Rules
First of all, we need to create the network and DHCP scope to feed the new IP range, from my EdgeMaz 12 I click on Add Interface > Add Vlan

Add the VLAN ID which interface you are creating it on and the IP address of the VLAN, yes I always use the last IP address in the range, some use the first address

Next, I will add the DHCP Scope for the devices, from the top menu bar click Services
![]()
Next, top left click Add DHCP Server and add the scope information similar to below and click Save

Now we need to allow DNS to listen to the Interface, from the top select DNS tab

NOTE: If you have a Google Chromecast or any other devices that need to be discovered by broadcast, you may need to add an MDNS repeater, I will add this below.
We now need to tell Unifi that we have a new VLAN on the network, from the Unifi page click settings

Next click on Networks then Create New Network

Create a new VLAN only network similar to what I’ve created below and click Save

If you hardwire int the Unifi Switch instead of using Wireless, you will need to untag the ports because IoT devices are not VLAN aware
Now we need to create the SSID, Click on settings again then on Wireless followed by Create New Wireless Network, I’m simply going to call mine it and give it a secure password and select the network it will join, I’m going to allow both 2.g and 5Ghz, I may change this later though just to be 5Ghz, I just need to make sure all my IoT devices are able to connect to 5Ghz. I’ve also blocked LAN to WLAN Multiabd Broadcast Data as well as prevented the SSID from being broadcast. I’m going to leave all the other settings as the default.
*Note when you add SSID’s to your Network, your WiFi will drop for all SSID’s whilst your new SSID is provisioned to you Access Points

At this stage, you should be able to connect to you new SSID and browse the Internet, I would use mobile device or laptop to test this out before we move onto the firewall settings, we do not want to be fault-finding firewalls for misconfigurations if we can’t even access the internet at this point before we continue with our IoT Security
I tested and everything worked fine apart from I could not connect to my CCTV that is on my VLAN 90, before I continue with my IoT Security lockdown I need to make sure I can access everything before I continue not the firewall rules.
From my mobile phone (VLAN 5) I could not discover my CCTV so I need to configure MDNS repeater to allow the broadcast over VLANS, from Router’s menu bar right-hand side select Config Tree.
![]()
On the left-hand side expand service > mdns > repeater
 Enter your networks that both of your devices are sitting on, in my case my mobile is on eth0 and my CCTV is on eth11.90, once I hit save I was able to see the CCTV app from my mobile device
Next in our IoT Security, we are going to set-up the security rules on the Router, from the menu bar select Firewall/NAT tab followed by the Firewall/NAT Grouip
![]()
Firstly I’m going to create a networking group that will encompass the RFC1918 space, click on Add Group to create a new rule and hit save:

Now we need to add the network ranges to the group, on the far right click actions then config, now add the ranges and click save.

Next click the firewall policy tab, when configuring policies you need to remember that there are three directions of traffic per interface/VLAN of the Router, these are In, Out and Local, the first rule we are going to create is our In rule, that is the traffic travelling in from VLAN 90 to either another internal network or out to the Internet
Click Add Ruleset and give it a description similar to this so you can easily recognise your rule, if you want to see the logs of this rule place a tick in the box, then click save.

Now on the right-hand-side click actions on the rule, you’ve just created and then edit Ruleset

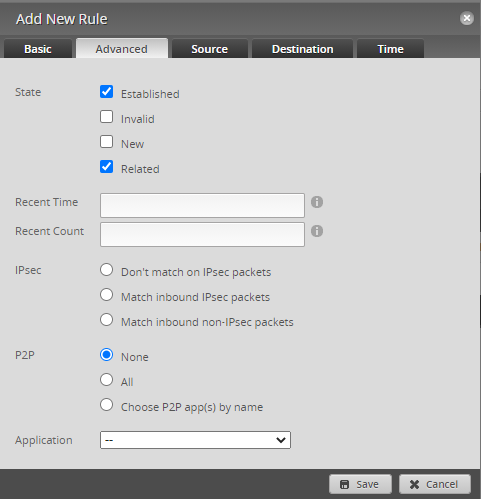
The first rule is to allow established related which is my private networking into my IoT network, my configuration looks like this.
Basic:
Description: Allow Established Related
Accept All Protocols
Advanced:
Established
Related
Destination:
RFC 198 Ranges


Once done we need to state which interface.

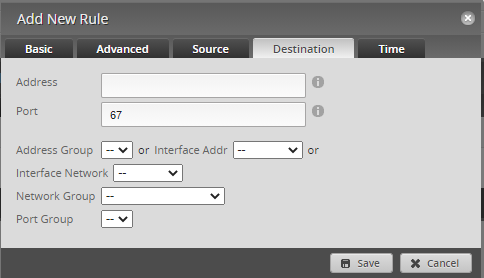
Next, we need to stop our IoT devices from getting to our main network but allow DNS and DHCP through, similar to above, create a new ruleset.
We need to add ports 53 for DNS along with 67 for DHCP


Now its time to test our configuration, firstly we need to make sure we can get DNS and DHCP passed through to our devices, I connected to the new IoT SSID and made sure I could get a DHCP address and get out to the internet.
Now we can test our IoT Security, the only thing I have connected now is my Ringbell and this is the first time I’ve looked at what it talks to.
SSH to the Edgerouter and ran the following command.
ubnt@Chetnet-R1:~$ show log tail | grep 192.168.70.6
Straight away my log shows the below, it’s not even captured any movement nor has the bell been pressed and there’s a bit of chatter; but what’s the chatter, who is my bell talking to whilst sitting idle.
<snip>
Dec 17 16:14:03 Chetnet-R1 kernel: [IoT_IN-default-A]IN=eth11.70 OUT=eth9 MAC=74:83:c2:d0:06:33:34:3e:a4:1b:5e:30:08:00:45:00:05:dc SRC=192.168.70.6 DST=54.174.15.186 LEN=1500 TOS=0x00 PREC=0x00 TTL=254 ID=55185 PROTO=TCP SPT=65349 DPT=443 WINDOW=12262 RES=0x00 ACK PSH URGP=0
Dec 17 16:17:24 Chetnet-R1 kernel: [IoT_IN-default-A]IN=eth11.70 OUT=eth9 MAC=74:83:c2:d0:06:33:34:3e:a4:1b:5e:30:08:00:45:00:00:5c SRC=192.168.70.6 DST=3.214.113.160 LEN=92 TOS=0x00 PREC=0x00 TTL=254 ID=55197 PROTO=TCP SPT=65280 DPT=9998 WINDOW=12132 RES=0x00 ACK PSH URGP=0
The log is longer than two lines, I’ve just stripped out the two IP it’s talking too.
Looking on who.is for 54.174.15.186 I see that this is an Amazon IP address, I remember linking to my Amazon account but not sure why I did
The 2nd IP address 3.214.113.160 also belongs to Amazon, seems like they are good friends and have a lot to talk about, time to nip over to the support over at Ring site to see what’s going on.
Here’s what the site says:
What are the benefits of linking my Ring account and my Amazon account?
Linking your Amazon account will allow you to gain access to certain Amazon features such as Amazon Key. Other benefits to account holders are currently in development and will be announced as soon as they’re ready.
Do I have to link my Ring account and my Amazon account?
No. Linking your accounts is strictly voluntary and you can unlink the accounts at any time.
Do I lose my Ring account if I link my Amazon account and use it to log into the Ring app?
No, Your Ring account still exists and can be accessed at any time.
Will Ring gain access to any of my Amazon information or vice-versa?
Yes. Agreeing to link these accounts grants Ring and Amazon the ability to access certain information from both accounts. Both companies, however, have stringent privacy policies regarding what can and cannot be accessed and both sets of policies will be honoured by both companies.
At the minute I don’t believe there are any benefits in me allowing the bell to be linked to my Amazon account so I will remove it from the bell app. Without me implementing IoT Security I would have just left my IoT devices on my main network.
Once I’ve moved my Amazon Echo’s over it will be interesting to see that chatter happens with Phillips Hue bulbs.
Please do get in touch with us if you would like to discuss this article on IoT Security or would like to see any other articles created.

